

This tutorial will be broken up in two parts and will walk you through the ins and outs of the navigation and how to set up navigation items on a Leiout website.
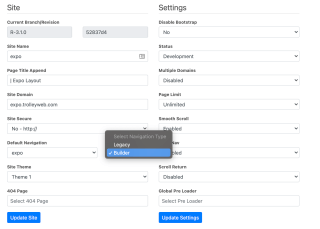
If you visit the Super Tab of the admin page, and go down to navigation, you will see that Leiout websites come with two types of navs: a legacy and builder nav. This is specifically referring to the top horizontal navigation bar of the site. When we create a new site, the default will be set to legacy. However, if you want to customize the nav, control the structure of the nav or integrate any custom plugins, you need to switch to builder.
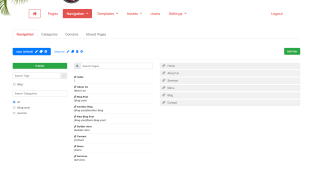
The next step it to go to the navigation tab and choose navigation. You can see in the image below, the default nav highlighted in blue. This is used for the main website navigation bar. This will appear on a new page of the website automatically when it is created. The different navigation options for the choose nav are set below the blue navs. You will see on the farthest left hand side the publish button, tag and category options. By clicking any of these it will change what information is displayed in the middle column. This middle column is displaying all the website pages I have made made in the site. To link a site page in the nav, you will need to drag and drop it to the right. Then you can press publish.
If you want to have a different navigation bar somewhere else on a page, say a sidebar navigation bar or a sub navigation bar, you can create a new one by pressing the green add nav button. You can select it and change the name. When it is selected, the options on the panel below are referring to that navigation.
To add this nav somewhere on the website, you will need to go to the page in builder mode, choose the nav element, and place it in a container. Then you will need to open the nav node toolbar and choose the correct nav. You can either leave it the way it is or change the mode to builder so that you can customize the structure of the nav. Either way you will want to turn off mobile collapse. Part two will discuss the structure of the nav and how to change it.

In this part of the navigation tutorial we dive deeper into how the navigation bars are set up in Leiout. As we discussed previously in part 1, Leiout comes with two types of navs: a legacy and builder nav. When a new site is created, the default will be set to legacy and if you want to customize the nav, control the structure of our nav, or integrate any custom plugins you need to switch to builder.
Let’s take a look first at a legacy nav structure.
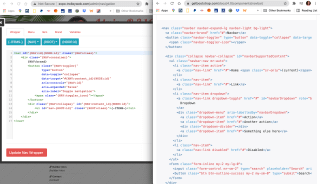
The legacy nav follows the bootstrap navbar layout except that it is broken up and defined among the wrapper, menu, items, brand, and variables tabs. You can see the similarities in structure if you put the legacy nav next to the bootstrap navbar layout and compare the two. The image below shows a side by side comparison. A clearer visual can be found in the tutorial video.
You can also view the bootstrap nav documentation here.
If you look at line 1 this matches the first line of the bootstrap layout except that there are variables placed in the html. Curly brackets indicate variables. These variables are defined under the variables tab.
Going to the variables tab you can see that the classes match the classes defined in the bootstrap layout. There are also native Leiout class present.
Here are some other comparisons between the Leiout nav structure and the Bootstrap nav structure:
If I don’t want to use the default nav that follows the structure of the bootstrap navbar, you will need to change this from legacy to builder under the super tab.
After switching to builder mode and then going back to your nav, you will see that the bootstrap structure we discussed above is still there. That’s because the builder nav comes pre-loaded with this setup so that there is something there. You can replace this with you own set up. Within the part 2 video we demonstrate how to set up a Navik navigation by altering the code within the different navigation tabs in order to customize it.
Hopefully you now have a better understanding of how the builder and legacy navigation works in Leiout.


This article explains how to use the Isotope JavaScript library and shows an example of it in action!

Let's learn how to create new pages in Leiout. Create blank pages, create pages from templates, and change the route/permalink. These are the basic building blocks of building out a website. These flexible tools will allow you to create now, and cha...

Opening a video in a modal has a lot of advantages. In this tutorial we'll learn how to do so using the venobox plugin.
